
Hexo 备忘
我的配置
- Hexo 版本: hexo-cli: 4.3.2, hexo: 7.3.0(当前最新)
- Node.js 版本: 22.16.0
- Git 版本: 2.47.0.sindows.2
- PNPM 版本: 10.12.4
- Windows 版本: 11
安装 Node.js
- 在 官网 安装 LTS 版本,电脑一般来说内存足够直接在 C 盘即可,当然,换路径也可以,我反正正常下载换路径,没什么问题。
- 安装完成后,检查是否安装成功。在键盘按下 win + R 键,输入
CMD,然后回车,打开 CMD 窗口,执行node -v命令,看到版本信息,则说明安装成功。
安装 Git
在 官网 安装最新版本的 64-bit Git for Windows Setup 安装包。
安装完成后,在命令行输入 git --version,如果显示版本号,则说明安装成功。
常用命令
git config -l  //查看所有配置
git config --system --list //查看系统配置
git config --global --list //查看用户(全局)配置
配置 Git 用户名和邮箱
git config --global user.name "你的用户名"
git config --global user.email "你的邮箱"
安装 包管理器
安装 npm 为一切的基石,一般来说,你安装了 node,也相当于你安装了 npm,通过一下命令来验证:
npm -v
node -v
修改 npm 源。npm 下载各种模块,默认是从国外服务器下载,速度较慢,建议配置成淘宝镜像。打开 CMD 窗口,运行如下命令:
npm config set registry https://registry.npm.taobao.org
安装 pnpm
pnpm 是一个快速、节省磁盘空间的包管理器,类似于 npm 和 yarn。安装 pnpm 可以通过以下命令:
npm install -g pnpm
为什么选择 pnpm?因为它的安装速度快,依赖管理更高效,且相对于 npm,我使用 npm 容易失败且慢,pnpm 给我的体验更好。
安装 Hexo
- 在 Git BASH 输入如下命令安装 Hexo:
pnpm install -g hexo-cli
- 安装完后输入
hexo -v验证是否安装成功。
Github配置
上述操作是前提,接下来是配置 Github。
注册 github 就不说了,很基础的东西,连我个代码小白都懂就不多说了。
创建仓库
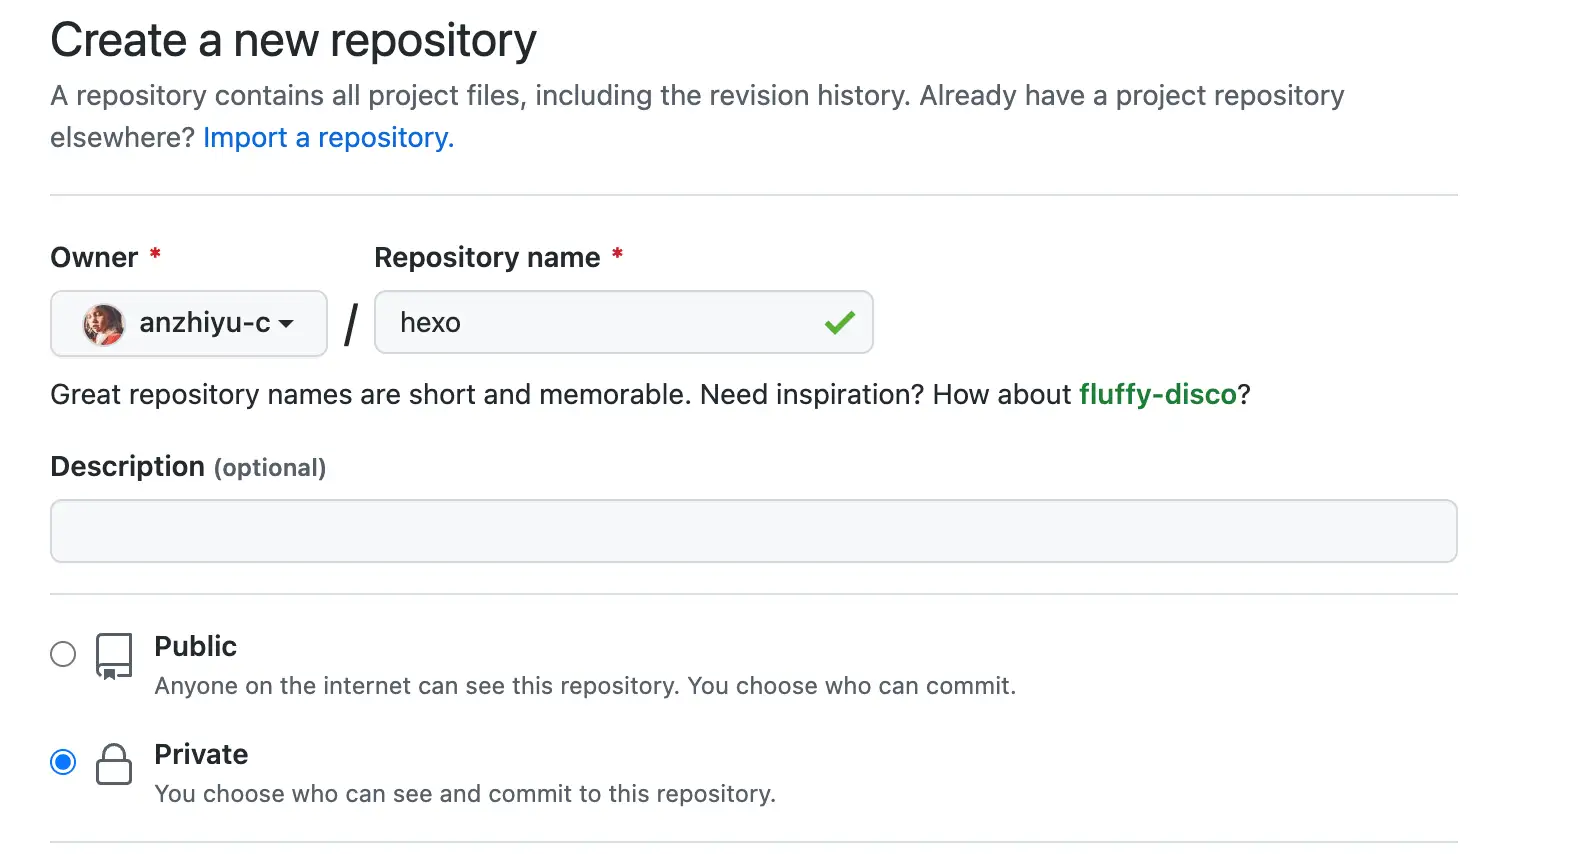
- 登录 GitHub,点击右上角的
+号,选择New repository。 - 填写仓库名称,建议使用
<username>.github.io格式(例如:yourusername.github.io),这样可以直接作为个人主页。
这里我不准备直接使用常规的 hexo deploy 命令来部署到 GitHub Pages,因为当你的文章一多,生成时间就会繁琐,这里的建议是使用 Github Actions 来自动部署。
- 首先要创建一个放置源码的私有仓库,以下称之为
hexo-source, - 然后要生成一个 Github 密钥:
访问 Github-> 头像(右上角)-> Settings-> Developer Settings-> Personal access tokens-> generate new token, 创建的 Token 名称随意,但必须勾选 repo 项 和 workflows 项。
点击 链接 前往生成
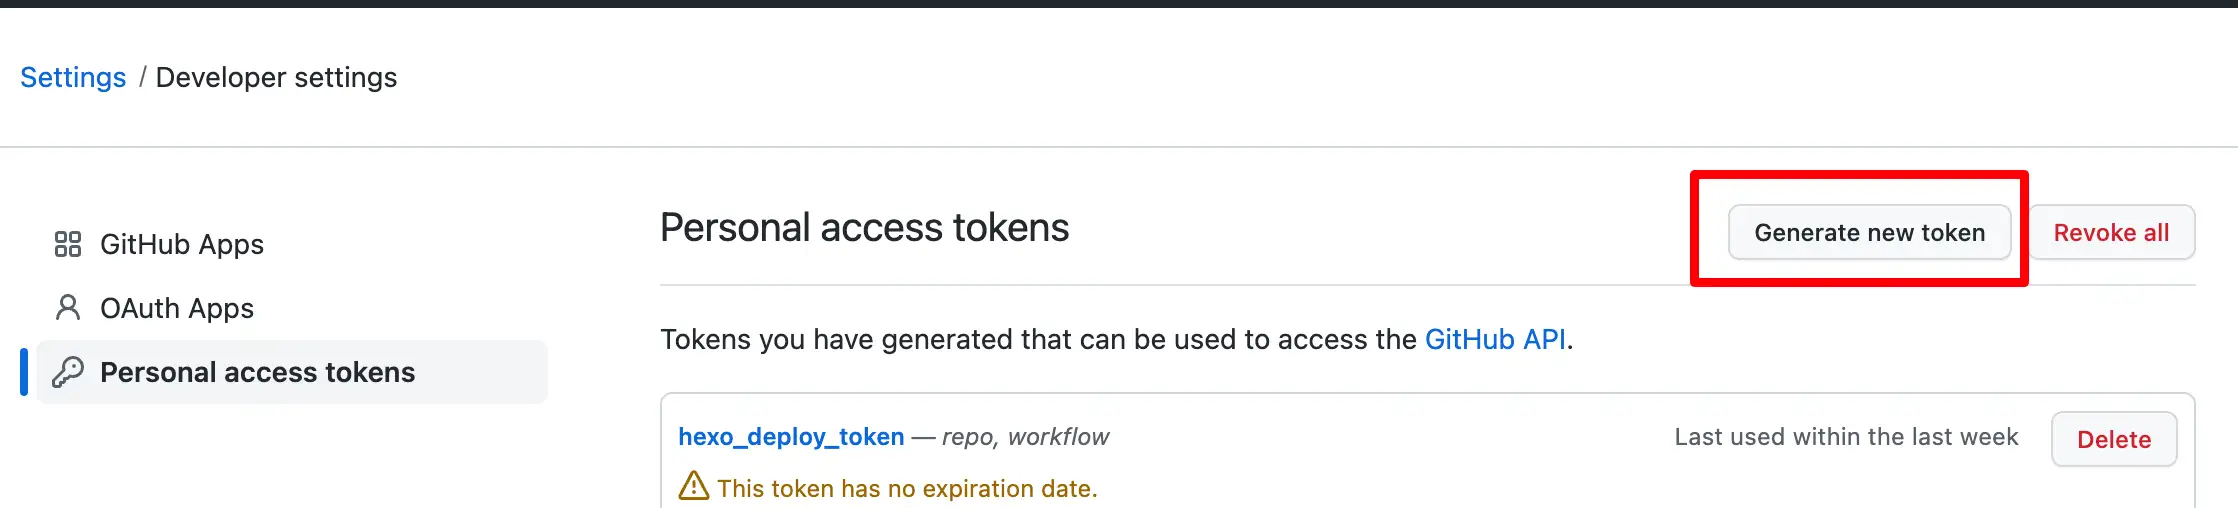
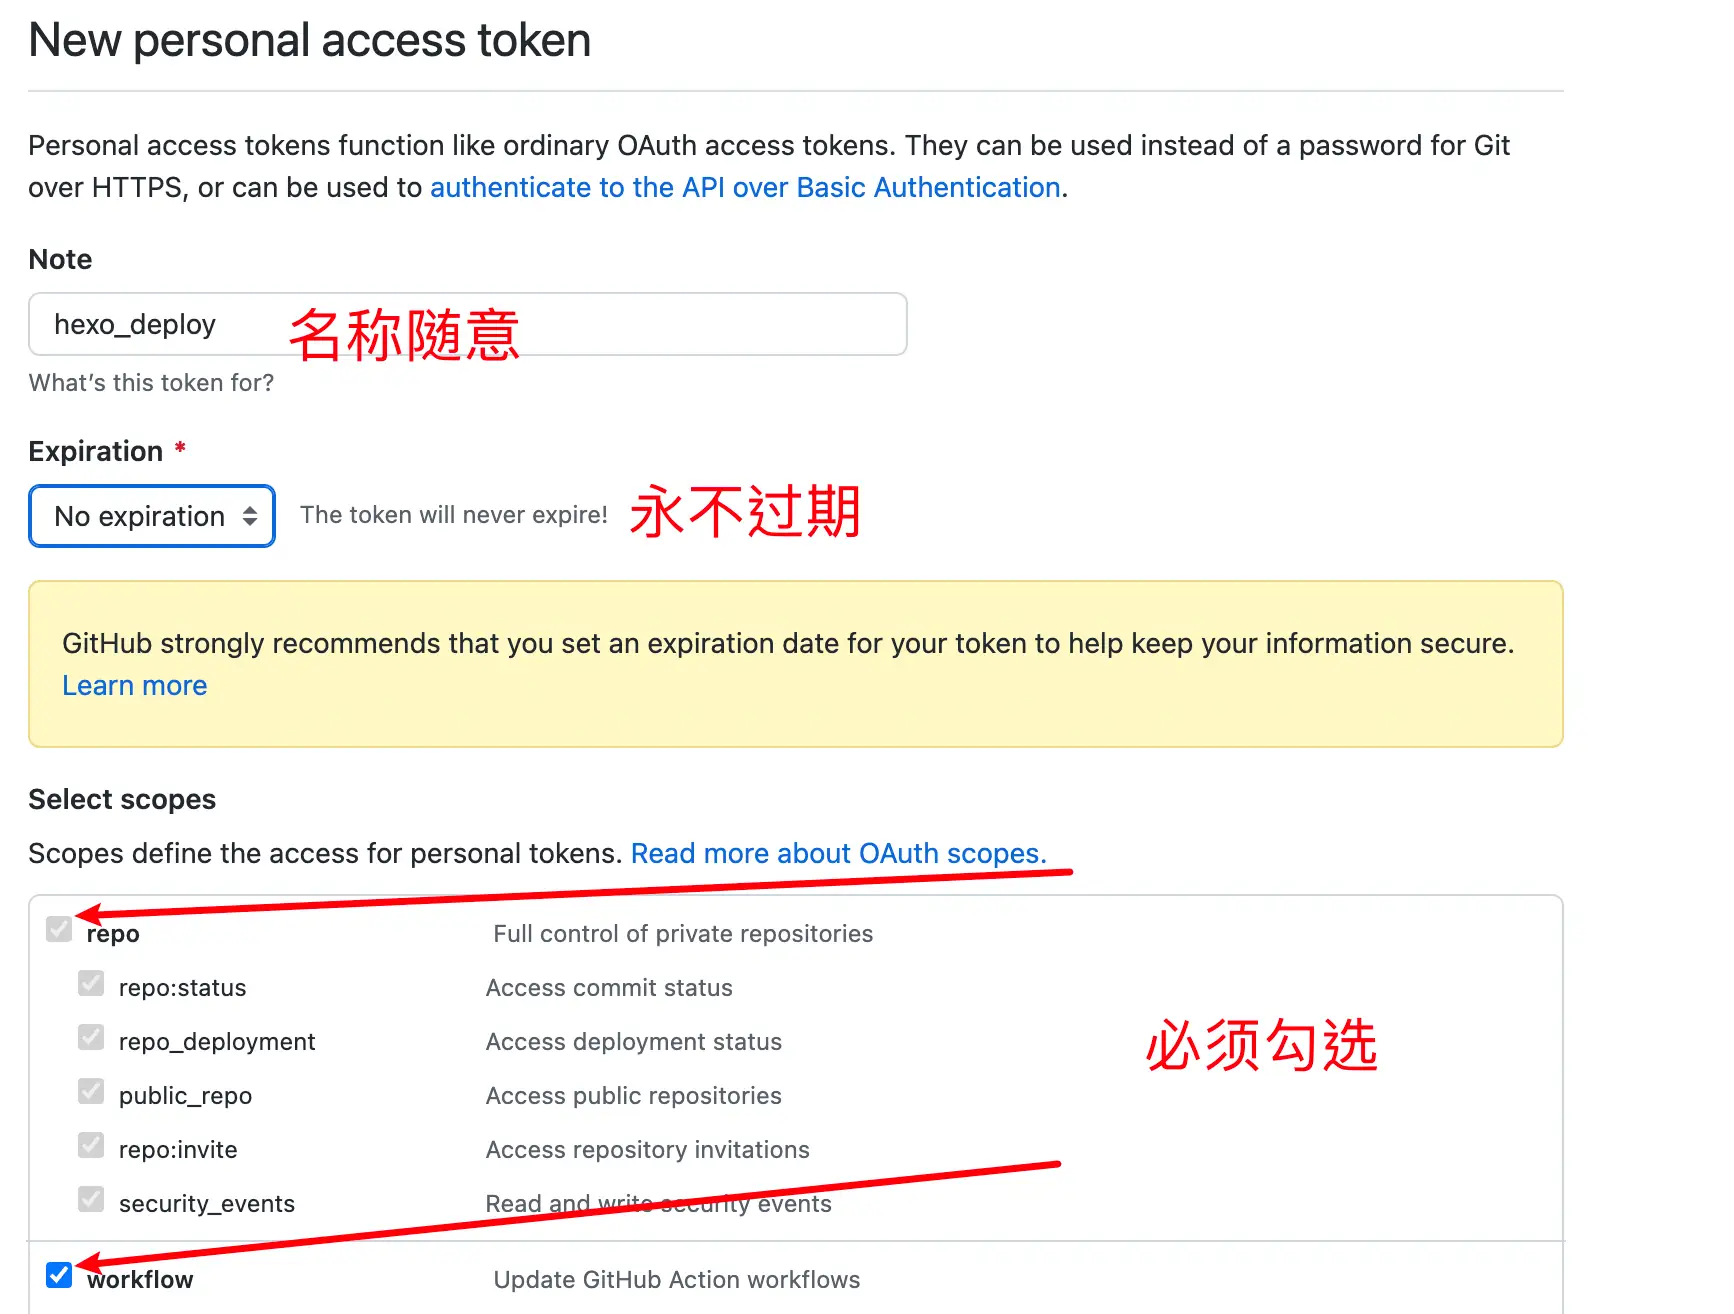
!!! token 只会显示这一次,之后将无法查看,所以务必保证你已经记录下了 Token。之后如果忘记了就只能重新生成重新配置了。
- 在
hexo-source仓库中的设置里点击设置 -> action -> General -> 工作流程权限- 勾选
Read and write permissions,并且勾选Allow <span style="background:#FF0000;"></span>all actions and reusable workflows。
- 勾选
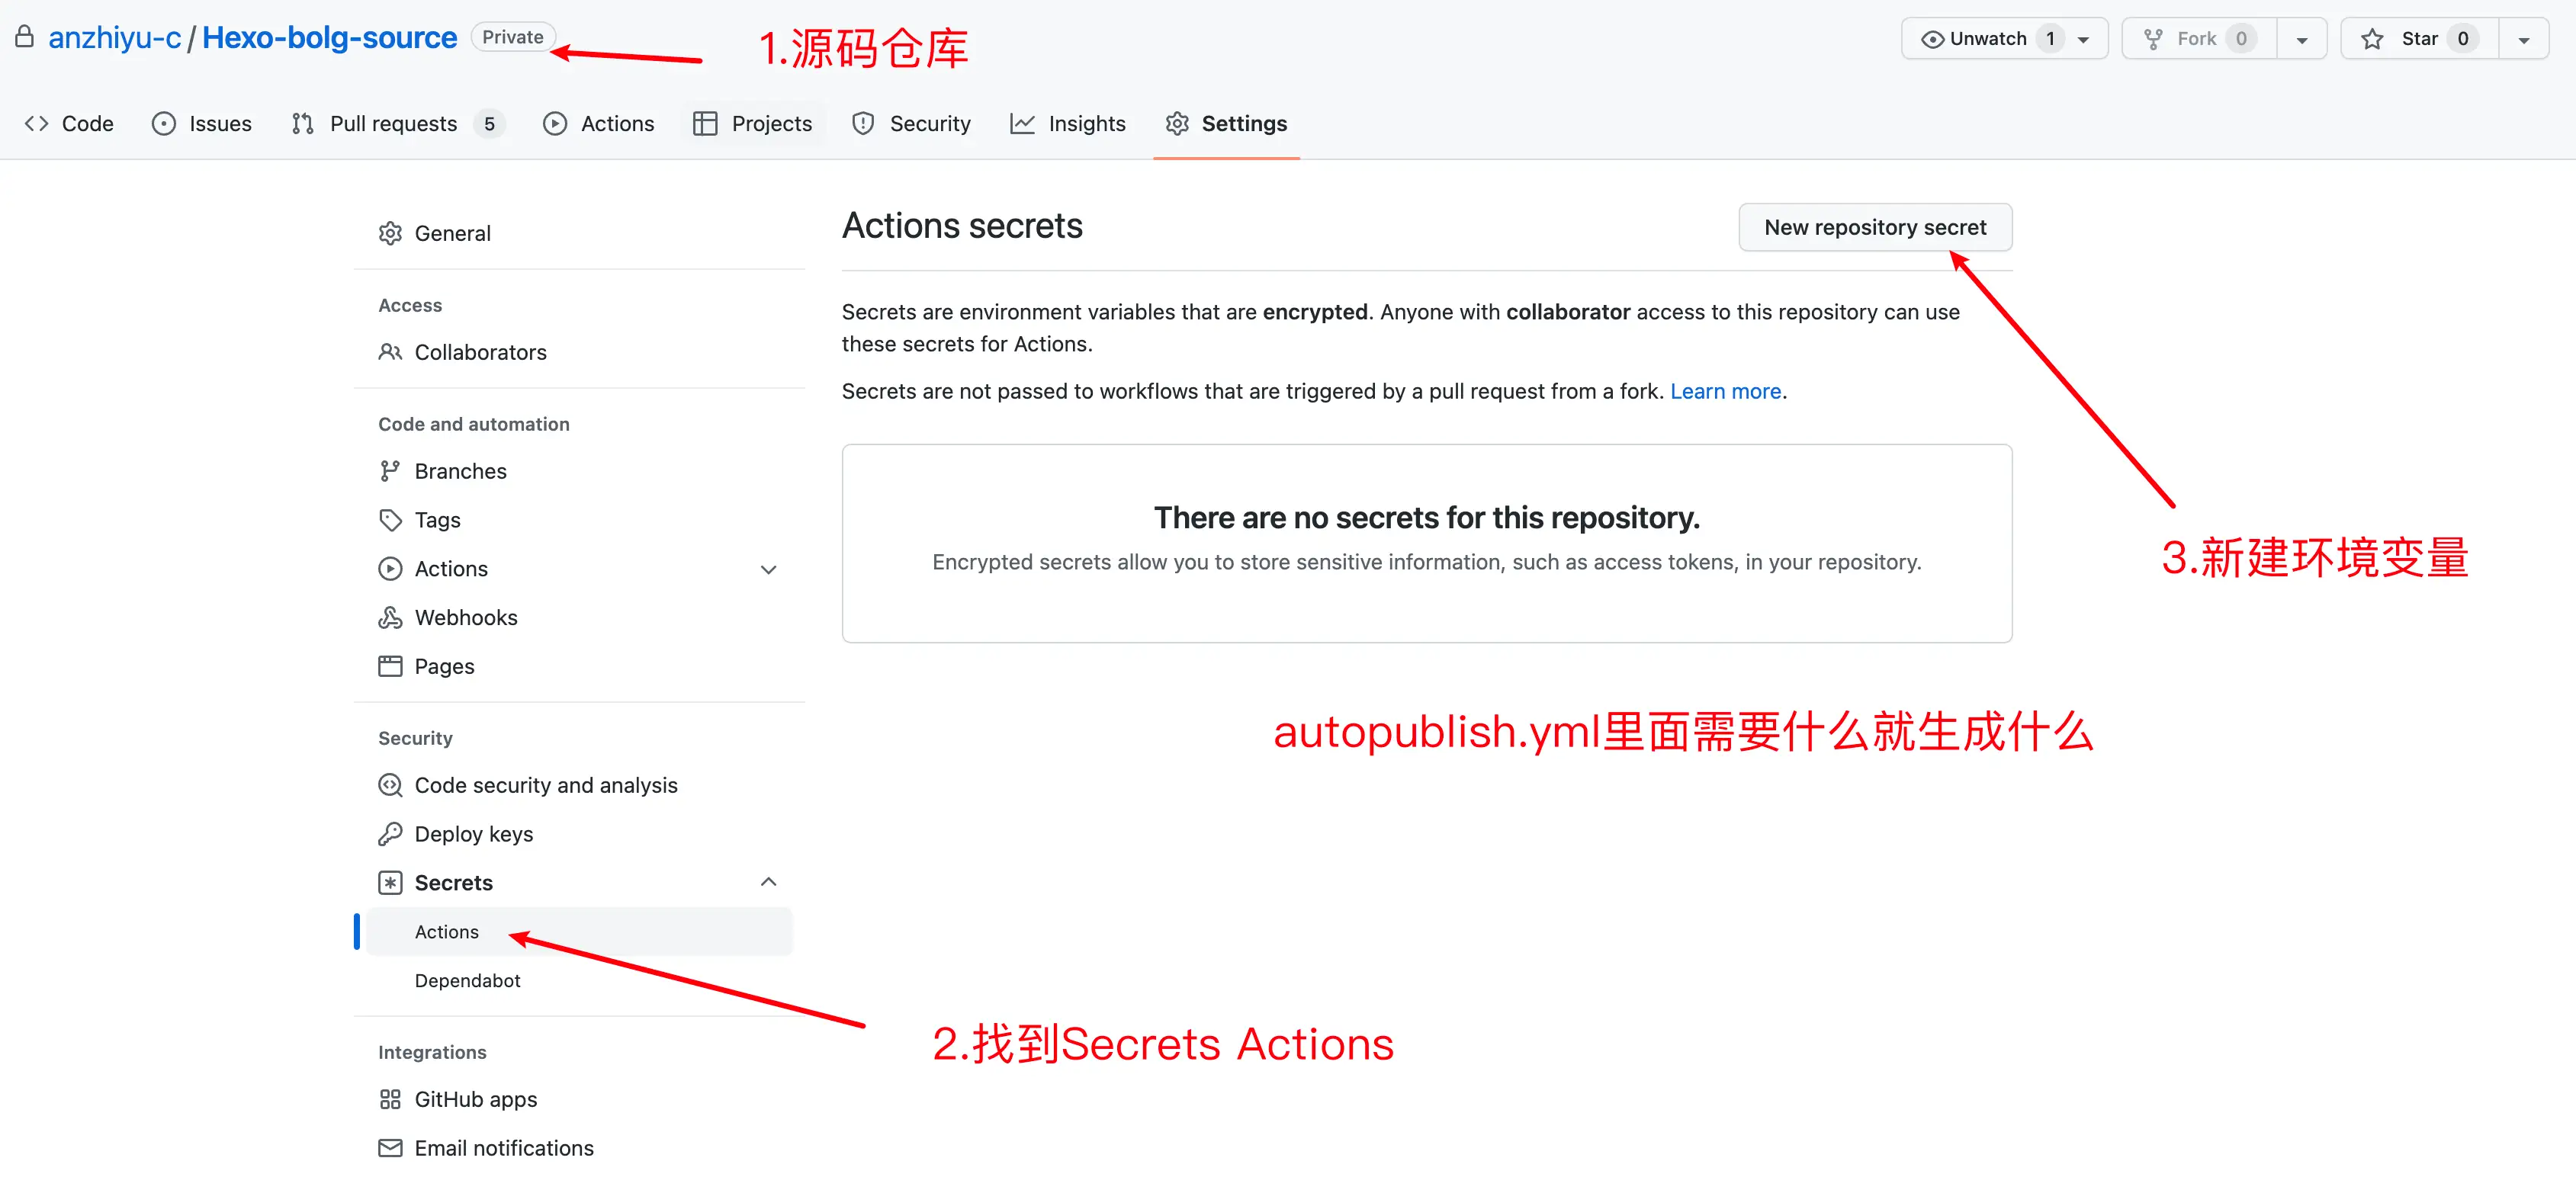
- 在设置里 -> Secrets and variables -> Actions -> New repository secret 添加
GITHUBTOKEN:放置你刚才生成的 Token。
上述是前置条件,接下来要先部署 hexo,你才好继续下一步。
初始化 Hexo
- 在本地新建一个文件夹,例如
hexo-solitude。 - 这里我是用的是 vscode 打开该文件夹,然后在终端输入以下命令来初始化 Hexo:
hexo init (项目名称)
我一般都不填,直接在文件下下就可以开始,如果你添加了项目名称,那么下一步就是:
cd (项目名称)
- 安装依赖包:
pnpm install
然后就是选择你想要的主题,这里我使用的是Solitude,具体的配置不细讲,我只讲一部分:
首先就是基本的安装,这里还是选择git clone没有别的原因,主要还是会改点源码,不想改的直接pnpm下载即可:
// git安装
git clone -b dev https://github.com/everfu/hexo-theme-solitude.git themes/solitude

// pnpm 安装
pnpm i hexo-theme-solitude
然后在_config.yml里修改成:
theme: solitude
配置
下列代码是我的备忘:
# Hexo Configuration
## Docs: https://hexo.io/docs/configuration.html
## Source: https://github.com/hexojs/hexo/

# Site
title: 喵落阁
subtitle: '克喵的博客'
description: '愿你看清一切真相后,依旧热爱你的家人和朋友。'
keywords: 克喵,kemiao,博客
author: 克喵爱吃卤面
language: zh-CN
timezone: 'Asia/Shanghai'

# URL
## Set your site url here. For example, if you use GitHub Page, set url as 'https://username.github.io/project'
url: # 你的域名
permalink: posts/:abbrlink.html
permalink_defaults:
pretty_urls:
  trailing_index: true # Set to false to remove trailing 'index.html' from permalinks
  trailing_html: true # Set to false to remove trailing '.html' from permalinks

# Directory
source_dir: source
public_dir: public
tag_dir: tags
archive_dir: archives
category_dir: categories
code_dir: downloads/code
i18n_dir: :lang
skip_render:

# Writing
new_post_name: :title.md # File name of new posts
default_layout: post
titlecase: false # Transform title into titlecase
external_link:
  enable: true # Open external links in new tab
  field: site # Apply to the whole site
  exclude: ''
filename_case: 0
render_drafts: false
post_asset_folder: false
relative_link: false
future: true
syntax_highlighter: highlight.js
highlight:
  line_number: false
  auto_detect: false
  tab_replace: ''
  wrap: true
  hljs: false
prismjs:
  preprocess: true
  line_number: true
  tab_replace: ''

# Home page setting
# path: Root path for your blogs index page. (default = '')
# per_page: Posts displayed per page. (0 = disable pagination)
# order_by: Posts order. (Order by date descending by default)
index_generator:
  path: ''
  per_page: 10
  order_by: -date

# Category & Tag
default_category: uncategorized
category_map:
tag_map:

# Metadata elements
## https://developer.mozilla.org/en-US/docs/Web/HTML/Element/meta
meta_generator: true

# Date / Time format
## Hexo uses Moment.js to parse and display date
## You can customize the date format as defined in
## http://momentjs.com/docs/#/displaying/format/
date_format: YYYY-MM-DD
time_format: HH:mm:ss
## updated_option supports 'mtime', 'date', 'empty'
updated_option: 'mtime'

# Pagination
## Set per_page to 0 to disable pagination
per_page: 10
pagination_dir: page

# Include / Exclude file(s)
## include:/exclude: options only apply to the 'source/' folder
include: []
exclude: []
ignore: []

# Extensions
## Plugins: https://hexo.io/plugins/
## Themes: https://hexo.io/themes/
theme: solitude

# Deployment
## Docs: https://hexo.io/docs/one-command-deployment
deploy:
  type: git
  repo: git@github.com-xx:kemiaofxjun/kemiaofxjun.github.io.git
  branch: main

# RSS Feed 配置
feed:
  type: atom          # 生成 atom.xml
  path: atom.xml      # 输出文件名
  limit: 20           # 最多显示文章数 (0=全部)
  hub:                # PubSubHubbub 中心 (可选)
  content: true       # 是否包含全文内容 (true=是, false=仅摘要)
  content_limit: 140  # 摘要长度(当 content=false 时生效)
  content_limit_delim: ' '  # 截断分隔符
  order_by: -date     # 按日期倒序排列
  autodiscovery: true # 在 HTML 头部添加自动发现标签

# 数学公式渲染配置
markdown:
  preset: 'default' # 使用的 MD 语法,默认使用的 GFM
  render:
    html: true # 渲染 html
    xhtmlOut: false
    langPrefix: 'language-' # 在代码块的类名中添加前缀(指定语言时)。
    breaks: true
    linkify: true # 如果你写了一个链接而不是 [name](link) 方式,会自动识别为链接并渲染。
    typographer: true # 将替换常见的印刷元素。
    quotes: '“”‘’' # 替换文章张的 "" '' 号
  enable_rules:
  disable_rules:
  plugins: # 使用插件
  anchors:
    level: 2 # 渲染标题的级别(h1,h2,h3)
    collisionSuffix: ''
    permalink: true
    permalinkClass: 'headerlink'
    permalinkSide: 'left'
    permalinkSymbol: ''
    case: 0
    separator: '-'
  images: # 图片的一些编译
    lazyload: true # 是否需要渲染 lazyload
    prepend_root: false
    post_asset: false
  inline: false

swpp:
  # 是否启用插件
  enable: true
  # 是否在发布前自动执行脚本
  auto_exec: true
  gen_dom: true

# 文章链接转数字或字母:https://github.com/rozbo/hexo-abbrlink
abbrlink:
    alg: crc16   #算法: crc16(default) and crc32
    rep: hex     #进制: dec(default) and hex: dec #输出进制:十进制和十六进制,默认为10进制。丨dec为十进制,hex

# https://github.com/hexojs/hexo-generator-sitemap
sitemap:
  path: sitemap.xml
  rel: false
  tags: true
  categories: true

algolia:
  appId: ""
  apiKey: ""
  adminApiKey: ""
  chunkSize: 5000
  indexName: "index-name"
  fields:
    - content:strip:truncate,0,500
    - excerpt:strip
    - gallery
    - permalink
    - photos
    - slug
    - tags
    - title

# hexo-safego安全跳转插件
# see https://blog.liushen.fun/posts/1dfd1f41/
hexo_safego:
  # 基本功能设置
  general:
    enable: true                # 启用插件
    enable_base64_encode: true  # 使用 Base64 编码
    enable_target_blank: true   # 从新窗口打开跳转页面

  # 安全设置
  security:
    url_param_name: 'u'         # URL 参数名
    html_file_name: 'go.html'   # 重定向页面的文件名
    ignore_attrs:               # 忽略处理的 HTML 结构
      - 'data-fancybox'

  # 容器与页面设置
  scope:
    apply_containers:           # 应用的容器选择器
      - '#article-container'
    apply_pages:                # 应用的页面路径
      - "/posts/"
      - "/devices/"
    exclude_pages:              # 排除的页面路径

  # 域名白名单
  whitelist:
    domain_whitelist:           # 允许的白名单域名,通过字符串匹配实现
      - "kemeow.top"
      - "kemiaosw.top"
      - "050815.xyz"
      - "314926.xyz"
      - "051531.xyz"

  # 页面外观设置
  appearance:
    avatar: https://img.314926.xyz/images/2025/08/13/no-background-kemiaofxjun.webp   # 跳转页面头像路径
    title: "喵洛阁"            # 跳转页面标题
    subtitle: "安全中心"         # 跳转页面副标题
    darkmode: auto              # 是否启用深色模式
    countdowntime: 4            # 跳转页面倒计时秒数,如果设置为负数则为不自动跳转

  # 调试设置
  debug:
    enable: false               # 启用调试模式

# 追番插件
# https://github.com/HCLonely/hexo-bilibili-bangumi
bangumi: # 追番设置
  enable: true
  source: bili
  path:
  vmid: 3546643173477234
  title: "追番列表"
  quote: "生命不息,追番不止!"
  show: 1
  lazyload: false
  loading:
  showMyComment: true
  pagination: false
  extra_options:
    top_img: false
    lazyload:
      enable: false
博客的其他修改基本就是来自教程和一些博主的网站。
插件
- 基础依赖
hexo-renderer-pug
pnpm i hexo-renderer-pug
- 字数统计
hexo-wordcount
pnpm i hexo-wordcount
配置里修改:
# --------------------------- start ---------------------------
# Word count
# 字数统计
# warning: Please install the hexo-wordcount plugin first.
# 警告: 请先安装 hexo-wordcount 插件。
wordcount: false
# --------------------------- end ---------------------------
- 数学公式 卸载
hexo-render-marked
npm un hexo-renderer-marked
安装 hexo-renderer-markdown-it katex @renbaoshuo/markdown-it-katex
pnpm i hexo-renderer-markdown-it katex @renbaoshuo/markdown-it-katex
配置里修改
# --------------------------- start ---------------------------
# Katex
# Latex formula support
# Latex 公式支持
katex:
  enable: false
  # Whether to load on each page
  # 是否在每个页面加载
  per_page: false
  # Whether to enable copy formula
  # 是否启用复制公式
  copytex: false
# --------------------------- end ---------------------------
添加以下内容到 _config.yml
markdown:
  preset: 'default'
  render:
    html: true
    xhtmlOut: false
    langPrefix: 'language-'
    breaks: true
    linkify: true
    typographer: true
    quotes: '“”‘’'
  enable_rules:
  disable_rules:
  plugins:
    - '@renbaoshuo/markdown-it-katex'
  anchors:
    level: 2
    collisionSuffix: ''
    permalink: false
    permalinkClass: 'header-anchor'
    permalinkSide: 'left'
    permalinkSymbol: '¶'
    case: 0
    separator: '-'
  images:
    lazyload: false
    prepend_root: false
    post_asset: false
  inline: false  # https://markdown-it.github.io/markdown-it/#MarkdownIt.renderInline
开启配置项
# --------------------------- start ---------------------------
# Katex
# Latex formula support
# Latex 公式支持
katex:
  enable: true
  # Whether to load on each page
  # 是否在每个页面加载
  per_page: true
  # Whether to enable copy formula
  # 是否启用复制公式
  copytex: false
# --------------------------- end ---------------------------
- PWA 安装 hexo-swpp 和 swpp-backends 插件
在博客根目录执行
pnpm i hexo-swpp

pnpm i swpp-backends
开启配置
# 大约在773行
# --------------------------- start ---------------------------
# PWA
# Progressive Web App
pwa:
  enable: true
  manifest: /manifest.json # manifest.json
  theme_color: "#006a73" # Theme color
  mask_icon: /img/pwa/favicon.png # Mask icon
  apple_touch_icon: /img/pwa/favicon.png # Apple touch icon
  bookmark_icon: /img/pwa/favicon.png # Bookmark icon
  favicon_32_32: /img/pwa/favicon_32.png # 32x32 icon
  favicon_16_16: /img/pwa/favicon_16.png # 16x16 icon
# --------------------------- end ---------------------------
在_config.yml里添加swpp配置
swpp:
  # 是否启用插件
  enable: true
  # 是否在发布前自动执行脚本
  auto_exec: true
  gen_dom: true
在 source 目录中创建 manifest.json 文件
{
    "name": "网站名称",
    "short_name": "网站名称缩写",
    "theme_color": "#006a73",
    "background_color": "#006a73",
    "display": "fullscreen",
    "scope": "/",
    "start_url": "/",
    "id": "/",
    "icons": [
      {
        "src": "/img/pwa/favicon_16.png",
        "sizes": "16x16",
        "type": "image/png",
        "purpose": "any"
      },
      {
        "src": "/img/pwa/favicon_16.png",
        "sizes": "16x16",
        "type": "image/png",
        "purpose": "maskable"
      },
      {
        "src": "/img/pwa/favicon_32.png",
        "sizes": "32x32",
        "type": "image/png",
        "purpose": "any"
      },
      {
        "src": "/img/pwa/favicon_32.png",
        "sizes": "32x32",
        "type": "image/png",
        "purpose": "maskable"
      },
      {
        "src": "/img/pwa/favicon.png",
        "sizes": "180x180",
        "type": "image/png",
        "purpose": "any"
      },
      {
        "src": "/img/pwa/favicon.png",
        "sizes": "180x180",
        "type": "image/png",
        "purpose": "maskable"
      }
    ],
    "splash_pages": null
}
在博客根目录创建一个 sw-rules.js 文件
module.exports.config = {
  /** @type {?ServiceWorkerConfig|boolean} */
  serviceWorker: {
    escape: 1,
    cacheName: 'SolitudeCache',
    debug: false,
  },
  register: {
    onsuccess: undefined,
    onerror: () =>
      console.error(
        'Service Worker 注册失败!可能是由于您的浏览器不支持该功能!'
      ),
    builder: (root, framework, pluginConfig) => {
      const { onerror, onsuccess } = pluginConfig.register;
      return `
            <script>
                (() => {
                    const sw = navigator.serviceWorker;
                    const error = ${onerror && onerror.toString()};
                    if (!sw?.register('${new URL(root).pathname}sw.js')
                        ${onsuccess ? `?.then(${onsuccess.toString()})` : ""}
                        ?.catch(error)
                    ) error()
                })()
            </script>`;
    },
  },
  /** @type {?DomConfig|boolean} */
  dom: {
    /** @type {?VoidFunction} */
    onsuccess: () => {
      caches
        .match('https://id.v3/')
        .then((res) => {
          if (res)
            res.json().then((json) => {
              utils &&
                utils.snackbarShow(
                  `已刷新缓存,更新为${json.escape + '.' + json.global + '.' + json.local
                  }版本最新内容`,
                  false,
                  2500
                );
            });
          else console.info('未找到缓存');
        })
        .catch((error) => console.error('缓存匹配出错', error));
    },
  },
  /** @type {?VersionJsonConfig|boolean} */
  json: {
    /** @type {number} */
    maxHtml: 15,
    /** @type {number} */
    charLimit: 1024,
    /** @type {string[]} */
    merge: [],
    exclude: {
      /** @type {RegExp[]} */
      localhost: [],
      /** @type {RegExp[]} */
      other: [],
    },
  },
  /** @type {?ExternalMonitorConfig|boolean} */
  external: {
    /** @type {number} */
    timeout: 5000,
    /** 拉取文件时地并发限制 */
    concurrencyLimit: 100,
    /** @type {({head: string, tail: string}|function(string):string[])[]} */
    js: [],
    /** @type {RegExp[]} */
    stable: [
      /^https:\/\/npm\.elemecdn\.com\/[^/@]+\@[^/@]+\/[^/]+\/[^/]+$/,
      /^https:\/\/cdn\.cbd\.int\/[^/@]+\@[^/@]+\/[^/]+\/[^/]+$/,
      /^https:\/\/cdn\.jsdelivr\.net\/npm\/[^/@]+\@[^/@]+\/[^/]+\/[^/]+$/,
    ],
    replacer: (srcUrl) => {
      if (srcUrl.startsWith('https://cdn.jsdelivr.net/npm/')) {
        const pathname = new URL(srcUrl).pathname;
        return [
          srcUrl,
          `https://cdn.cbd.int/${pathname}`,
          `https://npm.elemecdn.com/${pathname}`,
          `https://fastly.jsdelivr.net/npm/${pathname}`,
        ];
      } else {
        return srcUrl;
      }
    },
  },
};

module.exports.cacheRules = {
  simple: {
    clean: true,
    search: false,
    match: (url, $eject) =>
      url.host === $eject.domain && ['/404.html'].includes(url.pathname),
  },
  cdn: {
    clean: true,
    match: (url) =>
      [
        'cdn.cbd.int',
        'lf26-cdn-tos.bytecdntp.com',
        'lf6-cdn-tos.bytecdntp.com',
        'lf3-cdn-tos.bytecdntp.com',
        'lf9-cdn-tos.bytecdntp.com',
        'cdn.staticfile.org',
        'npm.elemecdn.com',
      ].includes(url.host) &&
      url.pathname.match(/\.(js|css|woff2|woff|ttf|cur)$/),
  },
};

module.exports.getSpareUrls = (srcUrl) => {
  if (srcUrl.startsWith('https://npm.elemecdn.com')) {
    return {
      timeout: 3000,
      list: [
        srcUrl,
        `https://fastly.jsdelivr.net/${new URL(srcUrl).pathname}`,
      ],
    };
  }
};

module.exports.ejectValues = (hexo, rules) => {
  return {
    domain: {
      prefix: 'const',
      value: new URL(hexo.config.url).host,
    },
  };
};

module.exports.skipRequest = (request) => request.url.startsWith("https://i0.hdslb.com") ||
  request.url.startsWith('https://meting.qjqq.cn') ||
  request.url.startsWith('https://api.i-meto.com');
- hexo-deploy-git 提交到git的插件
pnpm i hexo-deploy-git --save
- hexo-generator-feed hexo的rss插件
pnpm i hexo-generator-feed --save
- hexo 的短链接:
hexo-abbrlink
pnpm i hexo-abbrlink --save
在_config.yml里修改:
permalink: posts/:abbrlink/
# or
permalink: posts/:abbrlink.html
添加:
# abbrlink config
abbrlink:
  alg: crc32      # Algorithm used to calc abbrlink. Support crc16(default) and crc32
  rep: hex        # Representation of abbrlink in URLs. Support dec(default) and hex
  drafts: false   # Whether to generate abbrlink for drafts. (false in default)
  force: false    # Enable force mode. In this mode, the plugin will ignore the cache, and calc the abbrlink for every post even it already had an abbrlink. (false in default)
  writeback: true # Whether to write changes to front-matters back to the actual markdown files. (true in default)
- 博客的sitemap :
hexo-generator-sitemap
pnpm i hexo-generator-sitemap --save
在_config.yml里添加配置:
sitemap:
  path:
    - sitemap.xml
    - sitemap.txt
  template: ./sitemap_template.xml
  template_txt: ./sitemap_template.txt
  rel: false
  tags: true
  categories: true
- 使用algolia搜索 :
hexo-algoliasearch
- 注册algolia:
注册地址:dashboard.algolia.com/users/sign_up
- 创建应用:
注册成功后创建应用:dashboard.algolia.com/account/plan/create?from=dashboard
- search -> configure -> index添加index_name即可
在博客执行命令:
pnpm i hexo-algoliasearch --save
_config.yml里添加
algolia:
  appId: "Z7A3XW4R2I"
  apiKey: "12db1ad54372045549ef465881c17e743"
  adminApiKey: "40321c7c207e7f73b63a19aa24c4761b"
  chunkSize: 5000
  indexName: "my-hexo-blog"
  fields:
    - content:strip:truncate,0,500
    - excerpt:strip
    - gallery
    - permalink
    - photos
    - slug
    - tags
    - title
!!!配置完成后记得运行 hexo clean
在hexo g 后实行下列代码:
hexo algolia
- **hexo-safego**安全跳转插件
使用该插件之前,需要先安装 cheerio,cheerio 是一个轻量级的库,用于在服务器端快速、灵活地实现 jQuery 核心功能。在 hexo-safego 插件中,cheerio 被用来解析和操作生成的静态 HTML 内容,类似于在浏览器中使用 jQuery 处理 DOM 元素。这使得插件能够在生成静态页面时,处理和替换外部链接,增强博客的安全性,而不需要在客户端引入 jQuery。Hexo 一般都有这个插件,可以在 node_modules 查看,如果没有,请先执行:
pnpm i cheerio --save
然后即可安装该插件:
pnpm i hexo-safego --save
在hexo根目录的_config.yml文件中添加以下配置:
# hexo-safego安全跳转插件
# see https://blog.liushen.fun/posts/1dfd1f41/
hexo_safego:
  # 基本功能设置
  general:
    enable: true                # 启用插件
    enable_base64_encode: true  # 使用 Base64 编码
    enable_target_blank: true   # 打开新窗口
  # 安全设置
  security:
    url_param_name: 'u'         # URL 参数名
    html_file_name: 'go.html'   # 重定向页面的文件名
    ignore_attrs:               # 忽略处理的 HTML 属性
      - 'data-fancybox'
  # 容器与页面设置
  scope:
    apply_containers:           # 应用的容器选择器
      - '#article-container'
    apply_pages:                # 应用的页面路径
      - "/posts/"
      - "/devices/"
    exclude_pages:              # 排除的页面路径
  # 域名白名单
  whitelist:
    domain_whitelist:           # 允许的白名单域名
      - "qyliu.top"
      - "liushen.fun"
  # 页面外观设置
  appearance:
    avatar: /info/avatar.ico    # 头像路径
    title: "清羽飞扬"            # 页面标题
    subtitle: "安全中心"         # 页面副标题
    darkmode: true              # 是否启用深色模式
    countdowntime: -1           # 倒计时秒数
  # 调试设置
  debug:
    enable: false               # 启用调试模式
- hexo的追番页面:hexo-bilibili-bangumi
pnpm i hexo-bilibili-bangumi --save
在_config.yml配置:
bangumi: # 追番设置
  enable: true           # 是否启用
  source: bili          # 数据源
  path: bangumis/index.html  # 页面路径
  vmid:                 # 用户ID
  title: '追番列表'      # 页面标题
  quote: '生命不息,追番不止!' # 页面引言
  show: 1              # 初始显示页面: 0=想看, 1=在看, 2=看过
  lazyload: true       # 是否启用图片懒加载
  metaColor:           # meta 信息字体颜色
  color:               # 简介字体颜色
  webp: true          # 是否使用 webp 格式图片
  progress: true      # 是否显示进度条
  ...
cinema: # 追剧设置
  enable: true           # 是否启用
  source: bili
  ...
game: # 游戏设置,仅支持source: bgmv0
  enable: true           # 是否启用
  source: bgmv0
  ...
还在更新中。。。
Github action配置
承接段落的继续吧,未来会在出水一期。
接下来就是创建一个私有仓库,根据大佬的文章,是为了保护Token,见仁见智。
这个私有仓库的建立是存储Hexo博客代码,如果你要使用Qexo
,这也是必不可少的!
创建完成后,需要把博客的源码 push 到这里。首先获取远程仓库地址,此处虽然 SSH 和 HTTPS 均可。SSH 在绑定过 ssh key 的设备上无需再输入密码,HTTPS 则需要输入密码,但是 SSH 偶尔会遇到端口占用的情况。请自主选择。

这里之所以是私有仓库,是因为在接下来的配置中会用到 Token,如果 Token 被盗用,别人可以肆意操作你的 github 仓库内容,为了避免这一风险,才选择的博客源码闭源。
配置 Github Action
- 在
[Blogroot]新建.github文件夹,注意开头是有个.的。然后在.github内新建workflows文件夹,再在workflows文件夹内新建autodeploy.yml,在[Blogroot]/.github/workflows/autodeploy.yml里面输入
# 当有改动推送到 main 分支时,启动 Action
name: 自动部署

on:
  push:
    branches:
      - main # 自选分支

  release:
    types:
      - published

jobs:
  deploy:
    runs-on: ubuntu-latest
    steps:
      - name: 检查分支
        uses: actions/checkout@v4
        with:
          ref: main # 自选分支

      - name: 安装 Node
        uses: actions/setup-node@v4
        with:
          node-version: "22.x" # node版本

      - name: 安装 Hexo
        run: |
          export TZ='Asia/Shanghai'
          npm install hexo-cli -g
          npm install yamljs --save

      - name: 缓存 Hexo
        uses: actions/cache@v4
        id: cache
        with:
          path: node_modules
          key: ${{ runner.os }}-node-${{ hashFiles('**/package-lock.json') }}

      - name: 安装依赖
        if: steps.cache.outputs.cache-hit != 'true'
        run: |
          npm install --save
          npm install hexo-algoliasearch --save
          npm install hexo-bilibili-bangumi --save

      - name: 生成静态文件
        run: |
          node ./link.js
          hexo clean
          hexo generate
          hexo bangumi -u
          hexo algolia

      - name: 部署
        run: |
          cd ./public
          git init -b main
          git config --global user.name '${{ secrets.GITHUBUSERNAME }}'
          git config --global user.email '${{ secrets.GITHUBEMAIL }}'
          git add .
          git commit -m "${{ github.event.head_commit.message }} $(date +"%Z %Y-%m-%d %A %H:%M:%S") Updated by GitHub Actions"
          git push --force --quiet "https://${{ secrets.GITHUBUSERNAME }}:${{ secrets.GITHUBTOKEN }}@github.com/${{ secrets.GITHUBUSERNAME }}/${{ secrets.GITHUBUSERNAME }}.github.io.git" main
- 首先把Token直接放在仓库的文件里还是不太好。
- 像我这种在本地搞的,推不到仓库里,因为这里的token不能直接上传,我尝试过把
token:改成token: ${{ servets.GH_token }},但是依旧有各种问题,相反使用了店长的代码后,就大差不差,询问AI后就得到目前的代码,也就可以正式上传了。(无拉踩的意思) - 之后需要自己到仓库的 Settings->Secrets->actions 下添加环境变量,变量名参考脚本中出现的,依次添加。
重新设置远程仓库和分支
- 删除或者先把
[Blogroot]/themes/solitude/.git移动到非博客文件夹目录下,原因是主题文件夹下的.git文件夹的存在会导致其被识别成子项目,从而无法被上传到源码仓库。 - 在博客根目录
[Blogroot]路径下运行指令:
git init #初始化
git remote add origin git@github.com:[GithubUsername]/[SourceRepo].git #[SourceRepo]为存放源码的github私有仓库
git checkout -b master # 切换到master分支,
#2020年10月后github新建仓库默认分支改为main,注意更改
# 如果不是,后面的所有设置的分支记得保持一致
- 添加屏蔽项
.DS_Store
Thumbs.db
db.json
*.log
node_modules/
public/
.deploy*/
.deploy_git*/
.idea
themes/solitude/.git
如果不是solitude主题,记得替换最后一行内容为你自己当前使用的主题。
4. 之后再运行 git 提交指令,将博客源码提交到 github 上。
git add .
git commit -m "github action update"
git push origin master
#2020年10月后github新建仓库默认分支改为main,注意更改
- 此时你的主题文件夹若已经被正常上传,并且你也添加了主题文件夹下的.git 文件夹的屏蔽项。那你可以考虑把第二步移走或删除的
.git放回来,用作以后升级。(不禁怀疑真的有人会去用这个方式来升级吗)
挖坑
大致写到这,未来或许会有下一章挖坑?但是目前通用的就到这,然后后续会写Qexo的简单使用方法、solitude的一些配置更改和我踩坑经历吧。
评论区
评论加载中...